Classify images using Machine Learning
Note
I wrote the original article in spanish. So some references to resources and code are in spanish.
Introduction
In this article we will learn how to classify an image using Machine Learning. We will do this with the help of the ml5.js library. It is a project developed by Google whose objective is to make machine learning more accessible. This library is built on top of TensorFlow.js, which is a low-level library for performing operations related to neural networks and other Machine Learning concepts.
Requirements
To carry out this tutorial we need:
- A text editor. (It is recommended to use vscode).
- Have NodeJs installed with NPM.
- A web browser such as Firefox, Chrome or Edge Chromium.
File creation
We create a folder with a name of our choice, inside this folder we place the following files:
images/
index.html
index.js
In the images/ folder, we can place various images that we want to use. As part of the article I will provide 3 images that we can use in our tests. These images are free to use.
Images:
In the index.html file we place the following:
<html>
<head>
  <meta charset="UTF-8" />
  <title>Image classification using MobileNet and p5.js</title>
  <!-- TailwindCss for quick styling -->
  <link
    href="https://unpkg.com/tailwindcss@^1.0/dist/tailwind.min.css"
    rel="stylesheet"
  />
  <!-- ml5.js Library -->
  <script src="https://unpkg.com/ml5@0.4.3/dist/ml5.min.js"></script>
</head>

<body>
  <div class="h-full">
    <div class="text-center">
      <h1 class="text-2xl pt-5 font-bold">
        Image classification using MobileNet
      </h1>

      <div align="center">
        <img
          id="image"
          class="h-64 w-36 object-cover shadow rounded-lg my-3"
        />
      </div>

      <div class="my-3">
        <div class="text-lg font-semibold" id="label"></div>
        <div class="text-lg font-semibold" id="confidence"></div>
      </div>
    </div>
  </div>
  <script src="index.js"></script>
</body>
</html>
The html code contains in the <head> the references to TailwindCss for styling classes and most importantly, the ml5.js library that will help us analyze an image and obtain a categorization of it.
Then in the index.js file we place the following (code explanation in the file comments):
// Get the reference of the image tag in the HTML.
const img = document.getElementById('image');
// Declare a variable with the path of the image we want to use.
// In this example I place the ball.jpg image, however links to images on other sites
// would also work.
const imgSource = '/images/ball.jpg';
// We set the src attribute of the image tag with the image link.
img.setAttribute('src', imgSource);

window.onload = async function () {
  // When all the page content loads we execute the following code:
  // we use the imageClassifier method from ml5, selecting MobileNet as the data model.
  const classifier = await ml5.imageClassifier('MobileNet');

  // Get the reference of the 'label' and 'confidence' div
  const label = document.getElementById('label');
  const confidence = document.getElementById('confidence');

  // We execute the classify method to which we pass the reference of <img>
  const results = await classifier.classify(img);

  // We place the obtained results in the console
  console.log(results);

  // In the text of div#label we place the first classification obtained.
  label.innerHTML = `Detected: ${results[0].label}`;

  // In the text of div#confidence we place the confidence percentage with which the
  // image was classified.
  confidence.innerHTML = `Confidence: ${(results[0].confidence * 100).toFixed(
    2
  )}%`;
};
MobileNet is an online database powered by thousands of images.
Async and Await are used to wait for asynchronous code. Learn more in this post.
Code execution
We install a lightweight server called serve. Open the command console and type:
npm install -g serveThen, once serve is installed, in the project folder, open the console and type:
serveBy default, this creates a simple server running at http://localhost:5000
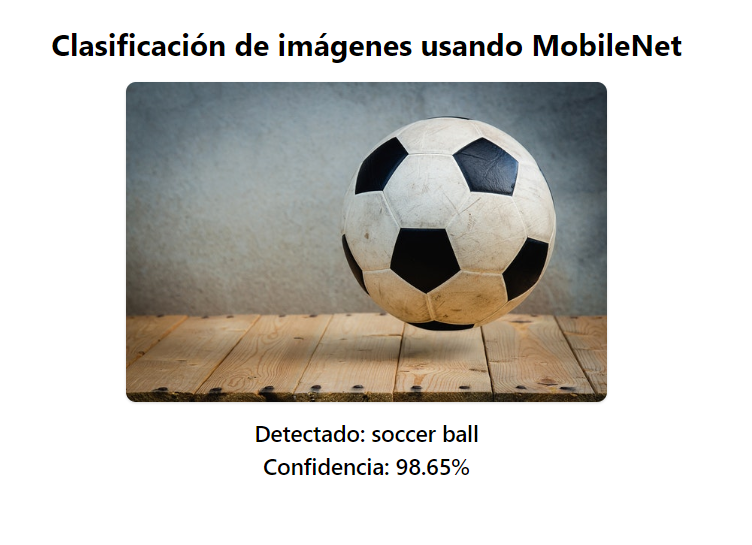
When opening this url, we should see the image we placed in imgSource and after a moment (since loading MobileNet can take a while), we should see the classification given to this image and with what confidence percentage (i.e. how confident the estimate is regarding the content).
As we place the results in the browser console, in it we can see all the classifications the image receives with a confidence percentage from 0 to 1 (i.e. from 0% to 100%).
We can continue changing the value of imgSource and refreshing the site to see the different classifications that different images receive. The MobileNet database is often more effective at detecting objects than people or landscapes. So you may see inaccurate classifications with certain images.